
If you’re new to building tones for a live setting, it’s completely normal to feel unsure about where to start. Almost everyone asks the same early questions:
“Should I just make a handful of tones and use them for everything?”
“Do I need a different preset for every song?”
“Is a per-song setup too complicated?”
Those questions make sense. When you first open up a modeler full of amp choices, effects, and routing options, it feels like creating tones for each song would be harder, not easier.
But here’s the part most players don’t realize:
Setting up your rig for live performance is actually very simple. The trick is having a strong foundation and a repeatable structure. You don’t need fifteen tones. You don’t need intricate programming. You just need four core sounds and small, intentional variations.
This guide walks you through that process in a straightforward way. It’s the system I wish I had when I was starting out. By the end, you’ll have a repeatable rig map you can trust onstage.
1. Create Your Four Foundational Core Tones
Before you think about specific songs or effect settings, get your foundational tones right. Most modern guitar tones can be built from four gain stage categories. Once you get these dialed in, everything else becomes much easier.
Clean Tone
Your open, dynamic sound. Useful for verses, picking patterns, intros, and anything that needs clarity. Chill vibes.
Overdrive Tone
Lightly pushed, slightly gritty. This is your everyday rhythm sound and probably the tone you’ll use the most. I like something on the edge of breakup where my dynamics do the heavy lifting, it can go clean if played softer, and get a nice drive if played with a heavy hand.
Distortion Tone
A more driven, energetic sound. Good for choruses, bigger sections, and anything that needs extra lift. I also like to use this for leads on more dynamically low sections. It gives a boost, and adds sustain naturally without being your “top gear”.
Lead Tone
A focused, slightly boosted tone. Usually paired with delay or reverb to give lines and hooks some separation.
These tones become the “language” you use across the entire set. You’ll revisit them constantly.
2. Mix Yourself with Your Drummer
A common beginner mistake is dialing in tones alone in headphones or in a quiet room. A clean tone that sounds beautiful by itself can disappear the moment the drummer hits a snare. A saturated tone that sounds massive alone can collapse under a full mix.
The shift that helps most players is simple: use the drums as your reference. Here’s what I aim for when it comes to volume balance:
Clean Tone: A clean tone by itself is great, but what happens if you need to play clean while the drummer is playing? You should balance your clean tone to make sense in the mix when the drummer is playing., Your tone needs enough compression, presence, and volume to be heard. When the drummer pulls back, your tone should be able to fill in the space. A trick I love is using compression on cleans to help with this dynamic variance.
Overdriven Tone: You’ll likely use this tone the most. It needs to work in several dynamic situations from being on its own to being in the context of a full band playing. This tone should match your clean tone in volume. I tend to like to lean towards a warmer overdrive sound in a live setting as to not get in the way of vocals and other lead instruments.
Distortion Tone: You’re main high-energy rhythm sound, but also, your “lead” sound on slower paced or more mid-tempo/dynamic songs. This tone should give you a slight volume boost for two reasons; 1) If you’re using this for high-energy rhythm, you need to keep up with crashing cymbals and a loud drum part, and 2) if used as a “lead” sound you want to sit on top of the mix, slightly above everything else.
Lead Tone: Your lead tone should be yet another small nudge in volume as this will only be used when trying to be the most heard instrument. You need to be careful not to go too loud however. I would always start this tone by making it brighter, adding mids, and cutting lows, before adjusting volume. Human ears perceive brighter as louder so you can get by with less here. Plus, these EQ adjustments make it easier to utilize wet effects such as delay and reverb without making your lead sound turn to mud.
If your four foundational tones are balanced against each other in a band context, you won’t need the engineer to constantly fix your levels. You’ll know that moving from clean to crunch or crunch to lead will feel smooth and intentional.
This is something you improve with practice. Rehearsal teaches you how your tones behave in real musical situations.
Save these 4 “presets” on your device somewhere you’ll remember them, and somewhere they won’t be at risk of getting deleted or replaced.
3. Build Song Banks
This is usually where new players feel intimidated, so it helps to think about it in practical terms.
A per-song preset approach is actually the easiest and most predictable way to run a live rig. It removes guesswork and makes your playing more consistent.
The structure is straightforward:
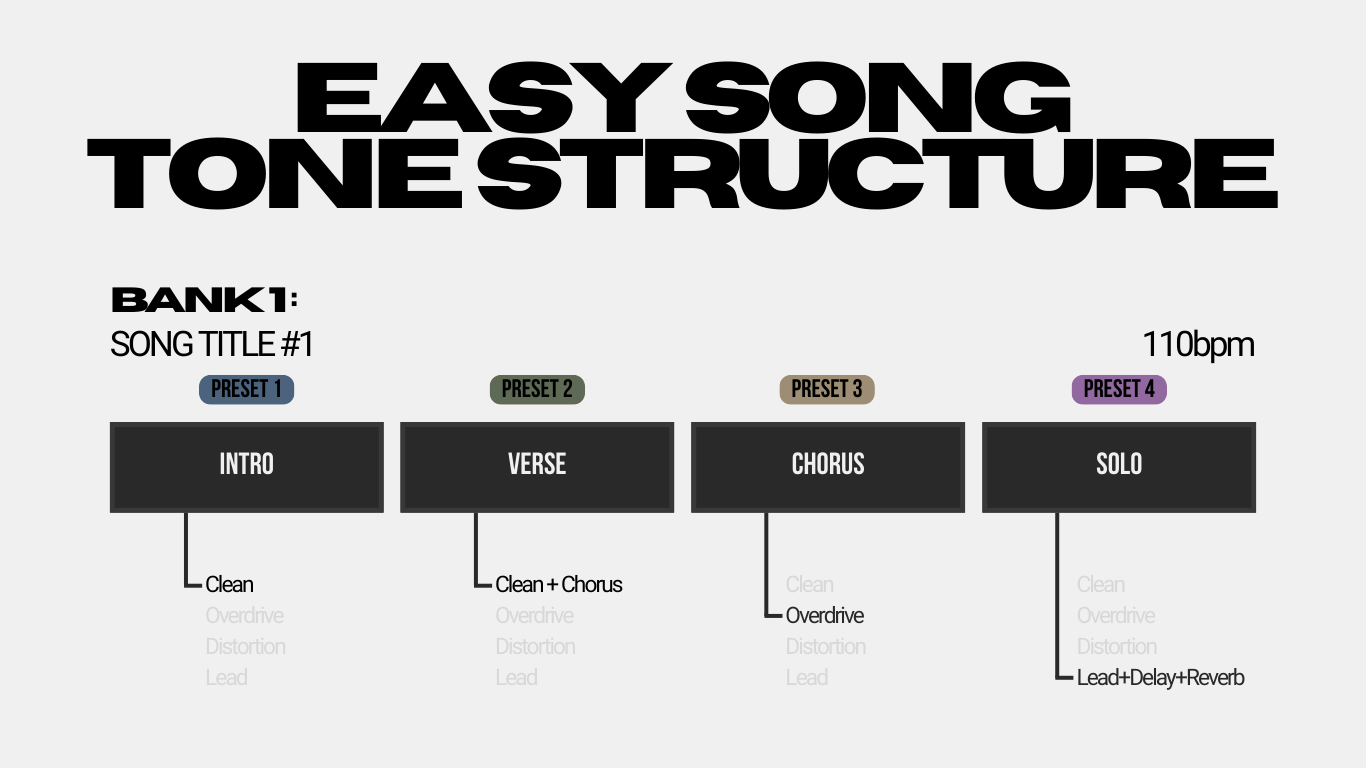
- Dedicate one bank on your device for each song.
- Inside that song’s bank, each preset/scene/snapshot represents a single tone for a specific moment in the song (think things like intro, chorus, solo, etc.). These tones are almost always variations of your four core sounds, with some bells and whistles (like modulation, delay, etc.) added into it.
Most songs only need two or three tones anyway. For example, your lead tone might be exactly the same across the entire set except for the delay BPM you save for each specific song. So instead of using one preset for your Lead and having to engage the delay, and tap in the BPM manually each time you want to use that sound, you can make copies of your core Lead Tone, and save it to your song-specific banks with the correct BPM already saved and the delay already turned on. Now you’re just hitting one switch to do those 3 items, otherwise this would take you about 5 taps to accomplish otherwise.
You can see how this approach makes not only your setup easier, but also your user experience during your set. This will free you up to focus on your playing and stage presence instead of worrying about if you can make that tone transition fast enough without it sounding stupid for a second until your taps catch up. Bonus, if you ever want these preset changes to fire automatically, this per-song workflow plugs straight into a tracks rig.
This approach simplifies your life because:
- You always know where you are. Verse, chorus, and lead tones are in the same place every time.
- Your transitions are consistent. You don’t have to worry about a chorus tone being too loud or too bright because it’s saved specifically for that moment.
- Songs feel repeatable. What worked in rehearsal will work onstage.
- You reduce footswitch stress. A single snapshot change can adjust multiple parameters at once.
- You stop fighting your rig. Everything lives in a dedicated place.
Once you try it, the idea of running everything from a handful of “general use” tones feels chaotic by comparison.
4. Tweak the Details
Creating a preset for each song doesn’t mean reinventing your tone. In most cases, you’re just adjusting small details so the part fits the arrangement better.
Typical variations include:
- Delay BPM, mix, and feedback
- Reverb decay and mix
- Turning on a modulation effect for one section
- Slight EQ adjustments
- A darker or lighter overdrive depending on the part
- A filtered lead for a more modern sound
These changes are minor, but they make the set feel intentional. The core tones stay the same. You’re simply shaping them to serve each song. This is the approach professionals use because it balances consistency with musicality.
Conclusion
You don’t need a huge library of tones to play live with confidence. Start with four solid foundational sounds. Balance them in the context of the band. Build your set using simple per-song presets. Make small adjustments as needed.
With that structure in place, you’ll spend less time worrying about your gear and more time focusing on actually playing. Your live sound becomes more consistent, your transitions feel natural, and you’re able to support the arrangement instead of fighting it.
Once you get really comfortable with using your rig this way, the next natural step in professional performance rigs is to start utilizing a backing tracks rig to automate your preset changes for you automatically. This is an amazing way to give yourself the ultimate freedom to focus on your playing and your audience! If you’re ready to take that next step I have a guide that will help you get your tracks rig up and running and ready to program changes for your live rig or modeler. Check it out right here.
Author